Drawing
It's really difficult to choose where to start if you want to learn how to draw from scratch as there are too many resources. I'm starting with Drawabox, a free course based on series of practical exercises to teach the basics. I'd probably go to Ctrl+Paint once I'm done.
The basics⚑
Changing the mindset⚑
Start your drawing path with the following guidelines to make your progression smoother:
- Focus on the experience of drawing instead of the result.
- Understand that doing something badly does not define who you are. So tackle the I can't draw that feeling with I can't draw that well. If you're afraid the thing you want to draw is out of your reach, draw it anyway.
- At least half of the time spent drawing must be devoted to drawing purely for its own sake. If you don't have much time, alternate the purpose of your sessions.
- Don't over control your hand with your brain to try to be absolutely precise and accurate. Doing so will result in numerous course corrections making your strokes wobbly, stiff and erratic. Furthermore, spending all the focus resources in precision, will result in a lack to solve the other problems involved. Once muscle memory is gained, the strokes will be cleaner.
- Draw exactly what you see, while you see it. Don't trust you memory, as it will simplify things without you noticing it.
-
Draw from your shoulder. We are used to pivot on the wrist as it makes stiff and accurate linework, suitable for writing. But falls apart when making smooth and consistent strokes.
So use the wrist when drawing stiff but precise marks in areas of detail or texture. There are plenty of cases where the elbow will work fine, but using it will get you in the habit of taking the path of least resistance. So try to use the shoulder.
This means driving the motion from the muscles that control that joint. As it has a considerable range of motion, you should be able to move your arm with minimal adjustment from your elbow.
If you catch yourself having fallen back to drawing from the elbow, do the following exercise: Draw pivoting from your wrist while locking the rest of the joints, to get used to what that feels like. Then lock it and move to the elbow. Finally lock the elbow and go for the shoulder.
Drawing at it's simplest level is the act of putting marks on a page in order or communicate or convey something. Marks should:
-
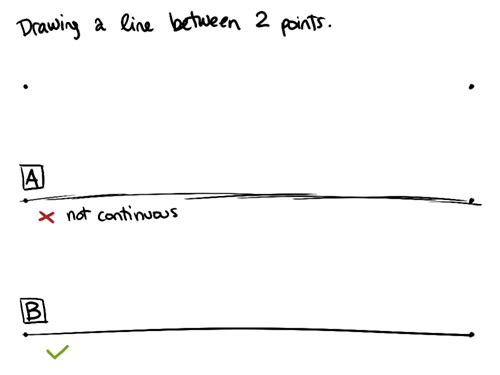
Flow continuously: When making a line between two points, do it with a single continuous stroke even if you miss the end.
-
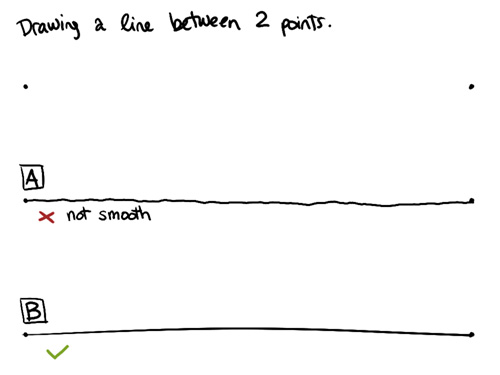
Flow smoothly: Draw with a confident and persistent pace (enough to keep your brain from interfering and attempting to course correct as you go). Again we favor flow over accuracy, so expect to make your lines less accurate.
-
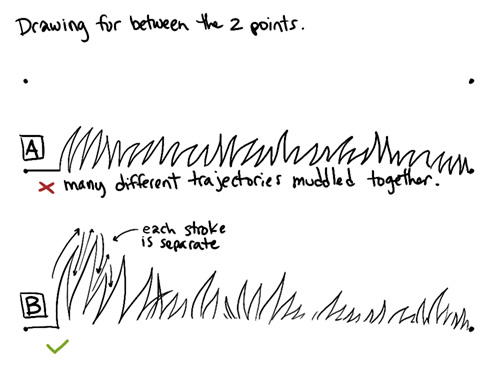
Maintain a consistent trayectory: Split lines into derivable strokes. Otherwise, you'll make mindless zigzags.
Drawing skills⚑
The course focuses on these psychological skills and concepts:
- Confidence: The willingness to push forwards without hesitation once your preparations are complete.
- Control: The ability to decide ahead of time what kind of mark you wish to puto down on the page, and to execute as intended.
- Patience: The path is hard.
- Spatial Reasoning: To be able to understand the things we draw as being three dimensional forms that exist in and relate to one another within the three dimensional world.
- Construction: The ability to look at a complex object and break it down into simple components that can be drawn individually and combined to reconstruct our complex object on a page.
- Visual Communication: The ability to take a concept, idea, or amount of information, and to convey it clearly and directly to an audience using visual means.
Ghosting⚑
Ghosting lines is a technique to break the mark making process into a series of steps that allows us to draw with confidence while also improving the accuracy of our results. It also forces us to think and consider our intentions before each and every mark we put down.
-
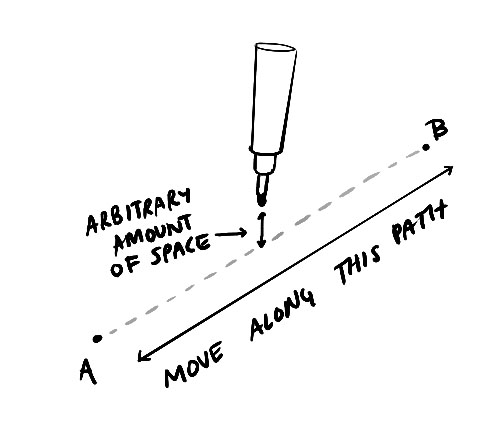
Planning: Lay out the terms of the line you want to draw, paint a dot for the start and another for the end.

-
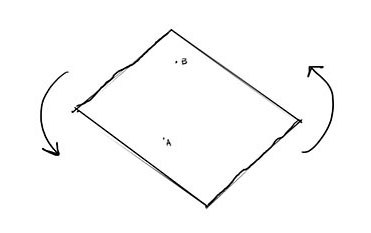
Rotating the page: Find the most comfortable angle of approach for the line you've planned. Usually it's roughly a 45 degree angle fom left to right (if you're right handed).
-
Ghosting: Go through the motion of drawing your line, over and over, in one direction, without actually touching the page, so as to build muscle memory.
-
Execution: Once you feel comfortable with the motion, without missing a beat or breaking the rhythm of repetition, lower your pen to the page and go through the motion one more time.
Drawabox course guidelines⚑
When doing the course exercises, try to:
- Read only the instruction pages that are assigned to each exercise.
- Don't redo the exercises until you achieve perfection, even when you don't feel satisfied with your results. Accept this now, and it will save you a lot of grief and wasted time in the future.
- Your only focus should be on following the instructions to the best of your current ability. Read and follow the instructions carefully to ensure you understand them.
- Each time you finish an exercise incorporate into a pool from which take two or three at the beginning of each session to do for 10 or 15 minutes.
Tools to use⚑
For the Drawabox course, you need a fineliner, also called felt tips or technical pens. The author recommends Staedtler Pigments Liners and Faber Castell PITT Artist Pens (their sizing is different, F is the equivalent to 0.5).
When using it, make sure you're not applying too much pressure, as it will damage the tip and reduce the flow of ink.
For the paper, use the regular printer one.
Basic Shapes⚑
Ellipses⚑
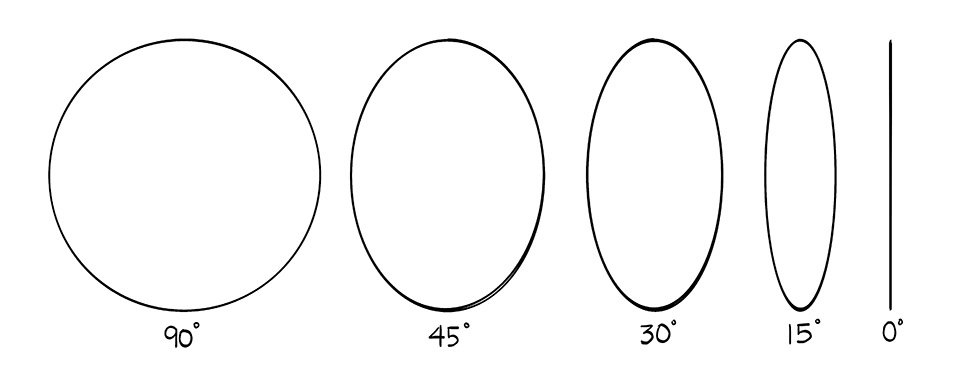
Ellipses are the next basic shape we're going to study (after the lines). They are extremely important and notoriously annoying to draw. Important because we're going to be using ellipses in 2D space to represent circles that exist in 3D space.
How our circle (in 3D space) is rotated relative to the viewer will determine how wide our ellipse is going to be drawn. The degree shift (or angle) is measured between the minor axis and the line joining the viewer to the center of the circle. It will therefore be 90 degrees when it's facing directly to us, and 0 when we only see a line.
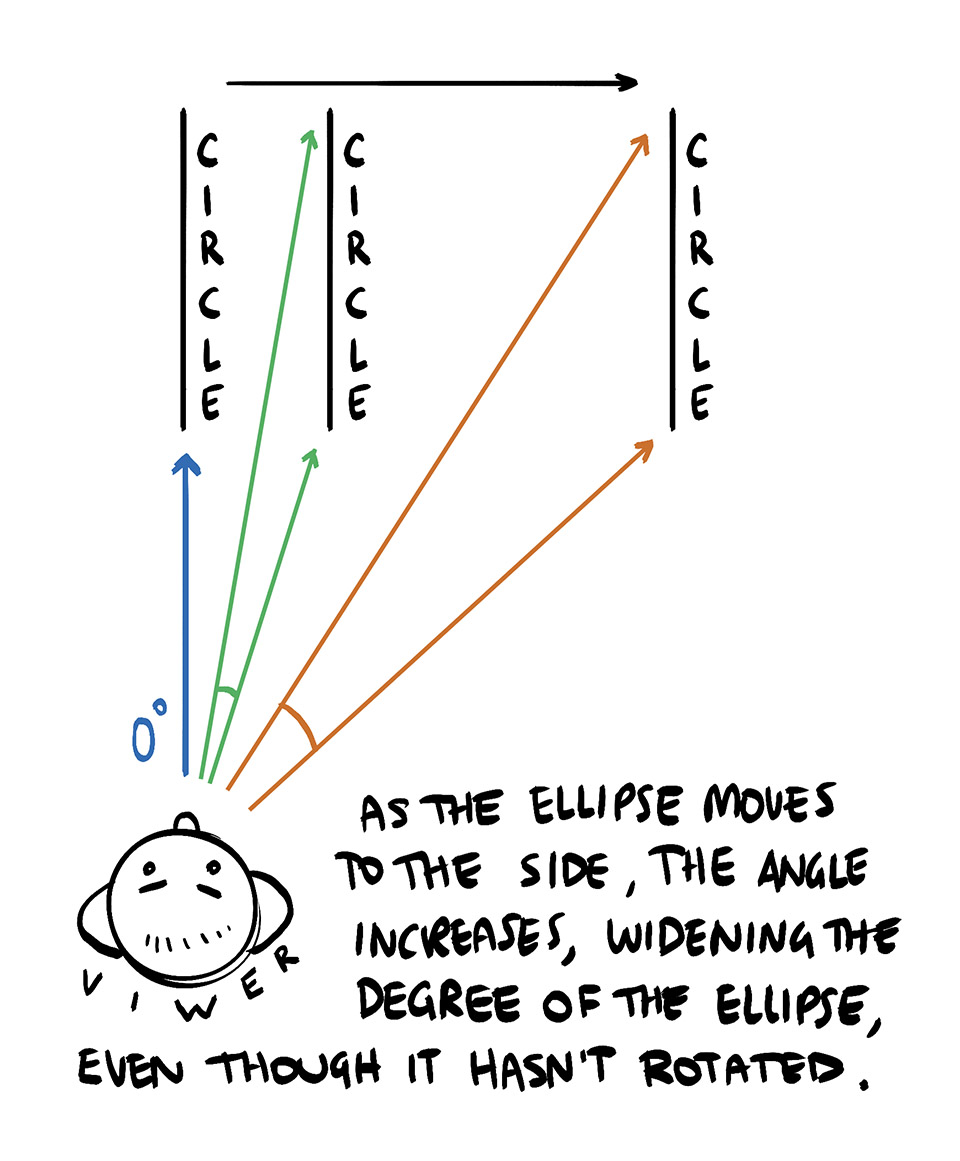
Keep in mind that the degree shift will change if we move the circle around even if we don't rotate it.
The minor axis is the line that passes across the ellipse's narrowest span and through it's center. This axis will split the ellipse into two equal symmetrical halves. An interesting property of the minor axis is that it coincides with and aligns with the normal vector of the circle.
This means that we've got two ways of establishing the orientation of our circle in 3D space, as we draw it on our 2D page.
- The degree (width) of the ellipse controlling the circle's rotation
- The minor axis of the ellipse controlling the orientation of the circle's normal vector.
If we need our circle to be oriented in a specific way in a more complicated scene, we will actually be able to start out with a normal vector line, then use it as the minor axis for our ellipse.
Taking it further, the minor axis can be used to build cylindrical forms because any section of a cylinder shares the same normal vector.
Drawing ellipses⚑
To draw ellipses follow the next steps:
- Decide on the ellipse degree, position and boundaries.
- Ghost the ellipse
-
Draw around the ellipse two or three times before lifting your pen.
When you try to hit your ellipse in a single round, it's usually going to come out uneven and wobbly (due to drawing too slowly and carefully) or extremely loose (due to simply not having built up the muscle memory to nail an ellipse). Drawing through your ellipses gives your arm the chance to familiarize itself with what's being asked of it in that first pass, and then firm it up in the second. It also helps you maintain the confidence needed to achieve a smooth, even shape, without totally losing control.
Check the ellipse exercises to practice your skills.
References⚑
Dive deeper⚑
Books⚑
- Drawing on the Right Side of the Brain by Betty Edwards : Recommended by ncase.me